AI大模型实战篇:AI Agent设计模式,ReAct
随着人工智能技术的不断进步,AI Agent设计模式逐渐成为研究和应用的热点。ReAct模式作为AI Agent设计模式的起点,以其模拟人类思考和行动过程的特点,为各种智能应用提供了一种有效的实现途径。

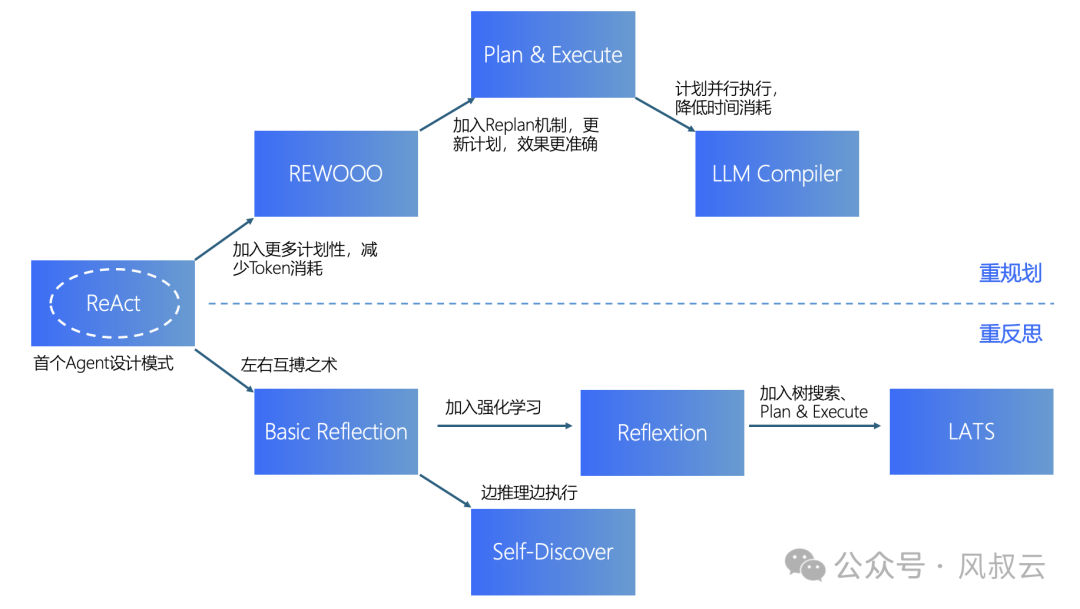
在《大佬们都在关注的AI Agent,到底是什么?用5W1H分析框架拆解AI Agent(下篇)》中,风叔简单介绍了AI Agent的八种设计模式。对于这八种设计模式,风叔整理了一张图,来阐明它们之间的关系。
ReAct模式最早出现的Agent设计模式,目前也是应用最广泛的。从ReAct出发,有两条发展路线:
一条更偏重Agent的规划能力,包括REWOO、Plan & Execute、LLM Compiler。
另一条更偏重反思能力,包括Basic Reflection、Reflexion、Self Discover、LATS。

在后续文章中,风叔将沿着上图的脉络,结合产品流程和源代码,详细介绍这八种AI Agent设计模式。
为什么选择结合源代码呢?因为在AI大模型时代,很多的概念和方法都太新了。只有结合源代码,产品经理才能真正理解背后的原理和逻辑,才能知道什么能做,什么不能做,AI的边界在哪里,以及该如何与人类经验配合。
下面,我们先从ReAct模式开始。
一、ReAct的概念
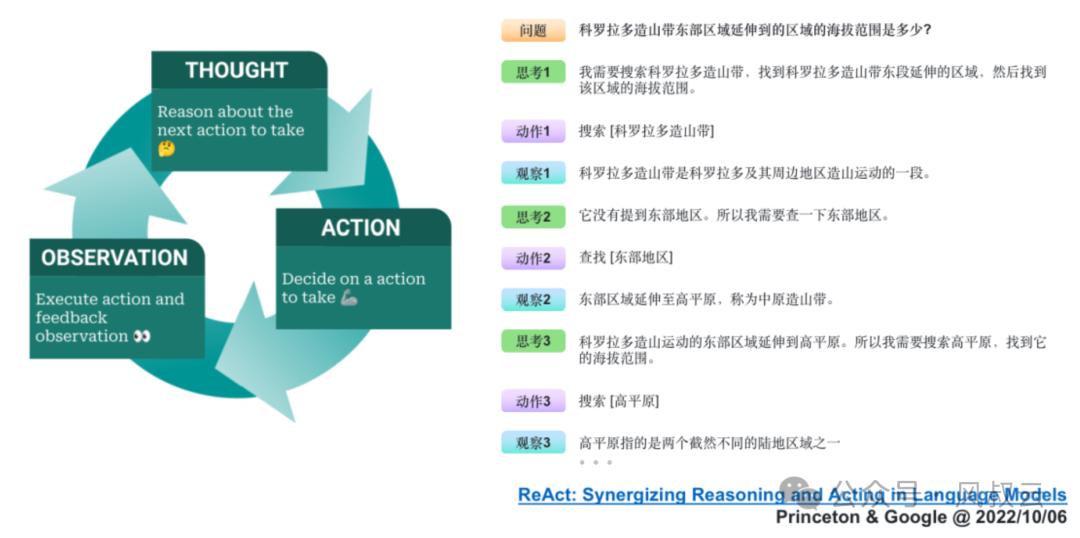
ReAct的概念来自论文《ReAct: Synergizing Reasoning and Acting in Language Models》,这篇论文提出了一种新的方法,通过结合语言模型中的推理(reasoning)和行动(acting)来解决多样化的语言推理和决策任务。ReAct 提供了一种更易于人类理解、诊断和控制的决策和推理过程。
它的典型流程如下图所示,可以用一个有趣的循环来描述:思考(Thought)→ 行动(Action)→ 观察(Observation),简称TAO循环。
- 思考(Thought):面对一个问题,我们需要进行深入的思考。这个思考过程是关于如何定义问题、确定解决问题所需的关键信息和推理步骤。
- 行动(Action):确定了思考的方向后,接下来就是行动的时刻。根据我们的思考,采取相应的措施或执行特定的任务,以期望推动问题向解决的方向发展。
- 观察(Observation):行动之后,我们必须仔细观察结果。这一步是检验我们的行动是否有效,是否接近了问题的答案。
- 循环迭代

如果观察到的结果并不匹配我们预期的答案,那么就需要回到思考阶段,重新审视问题和行动计划。这样,我们就开始了新一轮的TAO循环,直到找到问题的解决方案。
和ReAct相对应的是Reasoning-Only和Action-Only。在Reasoning-Only的模式下,大模型会基于任务进行逐步思考,并且不管有没有获得结果,都会把思考的每一步都执行一遍。在Action-Only的模式下,大模型就会处于完全没有规划的状态下,先进行行动再进行观察,基于观察再调整行动,导致最终结果不可控。

假设我们正在构建一个智能助手,用于管理我们的日程安排。
在reason-only模式中,智能助手专注于分析和推理,但不直接采取行动。
- 你告诉智能助手:“我明天有个会议。”
- 智能助手分析这句话,确定明天的会议时间、地点等细节。
- 它可能会提醒你:“明天下午3点有个会议,在公司会议室。”
在action-only模式中,智能助手专注于执行任务,但不做深入的推理或分析。
- 你告诉智能助手:“把我明天的会议改到上午10点。”
- 智能助手立即执行这个任务,将会议时间修改为上午10点。
- 它可能会简单确认:“您的会议已改到明天上午10点。”
在ReAct模式中,智能助手结合推理和行动,形成一个循环的感知-动作循环。不仅分析了你的需求(推理),还实际修改了日程安排(行动)。
- 你告诉智能助手:“我明天有个会议,但我想提前到上午10点。”
- 智能助手首先分析这句话,确定会议的原始时间和地点(感知阶段)。
- 然后,它更新你的日程安排,将会议时间改为上午10点(决策和动作执行阶段)。
- 最后,智能助手确认修改,并提供额外的信息:“您的会议已成功改到明天上午10点。提醒您,会议地点不变。
二、ReAct的实现过程
下面,风叔通过实际的源码,详细介绍ReAct模式的实现方法。在手机端阅读源代码的体验不太好,建议大家在PC端打开。
大家可以私信风叔,或者在评论区留言“ReAct源码”,获取ReAct设计模式的示例源代码。
第一步 准备Prompt模板
在实现ReAct模式的时候,首先需要设计一个清晰的Prompt模板,主要包含以下几个元素:
- 思考(Thought):这是推理过程的文字展示,阐明我们想要LLM帮我们做什么,为了达成目标的前置条件是什么
- 行动(Action):根据思考的结果,生成与外部交互的指令文字,比如需要LLM进行外部搜索
- 行动参数(Action Input):用于展示LLM进行下一步行动的参数,比如LLM要进行外部搜索的话,行动参数就是搜索的关键词。主要是为了验证LLM是否能提取准确的行动参数
- 观察(Observation):和外部行动交互之后得到的结果,比如LLM进行外部搜索的话,那么观察就是搜索的结果。
Prompt模板示例:
TOOL_DESC = """{name_for_model}: Call this tool to interact with the {name_for_human} API. What is the {name_for_human} API useful for? {description_for_model} Parameters: {parameters} Format the arguments as a JSON object."""
REACT_PROMPT = """Answer the following questions as best you can. You have access to the following tools:
{tool_descs}
Use the following format:

Question: the input question you must answer
Thought: you should always think about what to do
Action: the action to take, should be one of [{tool_names}]
Action Input: the input to the action
Observation: the result of the action
... (this Thought/Action/Action Input/Observation can be repeated zero or more times)
Thought: I now know the final answer
Final Answer: the final answer to the original input question
Begin!
Question: {query}"""
第二步 构建Agent
一个ReAct Agent需要定义好以下元素
- llm:背后使用的LLM大模型
- tools:后续会用到的Tools集合
- stop:什么情况下ReAct Agent停止循环
class LLMSingleActionAgent {
  llm: AzureLLM
  tools: StructuredTool[]
  stop: string[]
  private _prompt: string = '{input}'
  constructor({ llm, tools = [], stop = [] }: LLMSingleActionAgentParams) {
    this.llm = llm
    this.tools = tools
    if (stop.length > 4)
      throw new Error('up to 4 stop sequences')
    this.stop = stop
  }
 }
第三步 定义Tools
Tools有两个最重要的参数,name和description。
Name就是函数名,description是工具的自然语言描述,LLM 根据description来决定是否需要使用该工具。工具的描述应该非常明确,说明工具的功能、使用的时机以及不适用的情况。
export abstract class StructuredTool {
  name: string
  description: string
  constructor(name: string, description: string) {
    this.name = name
    this.description = description
  }

  abstract call(arg: string, config?: Record<string, any>): Promise<string>

  getSchema(): string {
    return `${this.declaration} | ${this.name} | ${this.description}`
  }

  abstract get declaration(): string
}
我们先简单地将两个描述信息拼接一下,为Agent提供4个算数工具:
1. Addition Tool: A tool for adding two numbers
2. Subtraction Tool: A tool for subtracting two numbers
3. Division Tool: A tool for dividing two numbers
4.MultiplicationTool: Atoolformultiplyingtwonumbers
一个很有意思的事情是,这几个算数工具函数并不需要实际的代码,大模型可以仅靠自身的推理能力就完成实际的算数运算。当然,对于更复杂的工具函数,还是需要进行详细的代码构建。
第四步 循环执行
执行器executor是在Agent的运行时,协调各个组件并指导操作。还记得ReAct模式的流程吗?Thought、Action、Observation、循环,Executor的作用就是执行这个循环。
class AgentExecutor {
  agent: LLMSingleActionAgent
  tools: StructuredTool[] = []
  maxIterations: number = 15

  constructor(agent: LLMSingleActionAgent) {
    this.agent = agent
  }

  addTool(tools: StructuredTool | StructuredTool[]) {
    const _tools = Array.isArray(tools) ? tools : [tools]
    this.tools.push(..._tools)
  }
}
executor会始终进行如下事件循环直到目标被解决了或者思考迭代次数超过了最大次数:
- 根据之前已经完成的所有步骤(Thought、Action、Observation)和 目标(用户的问题),规划出接下来的Action(使用什么工具以及工具的输入)
- 检测是否已经达成目标,即Action是不是ActionFinish。是的话就返回结果,不是的话说明还有行动要完成
- 根据Action,执行具体的工具,等待工具返回结果。工具返回的结果就是这一轮步骤的Observation
- 保存当前步骤到记忆上下文,如此反复
async call(input: promptInputs): Promise<AgentFinish> {
    const toolsByName = Object.fromEntries(
      this.tools.map(t => [t.name, t]),
    )

    const steps: AgentStep[] = []
    let iterations = 0

    while (this.shouldContinue(iterations)) {
      const output = await this.agent.plan(steps, input)
      console.log(iterations, output)

      // Check if the agent has finished
      if ('returnValues' in output)
        return output

      const actions = Array.isArray(output)
        ? output as AgentAction[]
        : [output as AgentAction]

      const newSteps = await Promise.all(
        actions.map(async (action) => {
          const tool = toolsByName[action.tool]

          if (!tool)
            throw new Error(`${action.tool} is not a valid tool, try another one.`)

          const observation = await tool.call(action.toolInput)

          return { action, observation: observation ?? '' }
        }),
      )

      steps.push(...newSteps)

      iterations++
    }

    return {
      returnValues: { output: 'Agent stopped due to max iterations.' },
      log: '',
    }
  }
第五步 实际运行
我们提出一个问题,看看Agent怎么通过ReAct方式进行解决。 “一种减速机的价格是750元,一家企业需要购买12台。每台减速机运行一小时的电费是0.5元,企业每天运行这些减速机8小时。请计算企业购买及一周运行这些减速机的总花费。”
describe('agent', () => {
  const llm = new AzureLLM({
    apiKey: Config.apiKey,
    model: Config.model,
  })
  const agent = new LLMSingleActionAgent({ llm })
  agent.setPrompt(REACT_PROMPT)
  agent.addStop(agent.observationPrefix)
  agent.addTool([new AdditionTool(), new SubtractionTool(), new DivisionTool(), new MultiplicationTool()])

  const executor = new AgentExecutor(agent)
  executor.addTool([new AdditionTool(), new SubtractionTool(), new DivisionTool(), new MultiplicationTool()])
  it('test', async () => {
    const res = await executor.call({ input: '一种减速机的价格是750元,一家企业需要购买12台。每台减速机运行一小时的电费是0.5元,企业每天运行这些减速机8小时。请计算企业购买及一周运行这些减速机的总花费。' })
    expect(res).toMatchInlineSnapshot(`
      {
        "log": "Final Answer: The total cost of purchasing and operating the gearboxes for a week is 9336 yuan.",
        "returnValues": {
          "output": "The total cost of purchasing and operating the gearboxes for a week is 9336 yuan.",
        },
      }
    `)
  }, { timeout: 50000 })
})
我们来看一下Agent的输出,以及Agent在这个过程,是如何思考和行动的。可以看到,通过Thought、Action、Observation的循环,AI Agent很好地一步步完成最终答案的输出。
Question:一种减速机的价格是750元,一家企业需要购买12台。每台减速机运行一小时的电费是0.5元,企业每天运行这些减速机8小时。请计算企业购买及一周运行这些减速机的总花费
Thought:I need to calculate the total cost of purchasing and operating the gearboxes for a week.
Action: Multiplication Tool
Action Input: [750, 12]
Observation: 9000
Thought: Now I need to calculate the cost of operating the gearboxes for a day.
Action: Multiplication Tool
ActionInput:[0.5,8,12]
Observation: 48
Thought: Now I need to calculate the cost of operating the gearboxes for a week.
Action: Multiplication Tool
Action Input: [48, 7]
Observation: 336
Thought: Now I need to calculate the total cost of purchasing and operating the gearboxes for a week.
Action: Addition Tool
Action Input: [9000, 336]
Observation: 9336
总结
在AI Agent的多种实现模式中,ReAct模式是最早出现、也是目前使用最广泛的模式。ReAct的核心思想就是模拟人思考和行动的过程,通过Thought、Action、Observation的循环,一步步解决目标问题。
ReAct模式也存在很多的不足:
- 首先是LLM大模型的通病,即产出内容不稳定,不仅仅是输出内容存在波动,也体现在对复杂问题的分析,解决上存在一定的波动
- 然后是成本,采用ReAct方式,我们是无法控制输入内容的。因为在任务提交给LLM后,LLM对任务的拆解、循环次数是不可控的。因此存在一种可能性,过于复杂的任务导致Token过量消耗。
- 最后是响应时间,比起大部分API接口毫秒级的响应,LLM响应时间是秒级以上。在ReAct模式下,这个时间变得更加不可控。因为无法确定需要拆分多少步骤,需要访问多少次LLM模型。因此在在秒级接口响应的背景下,做成同步接口显然是不合适的,需要采用异步的方式。而异步方式,又会影响用户体验,对应用场景的选择又造成了限制。
但是无论如何,ReAct框架提出了一种非常好的思路,让现有的应用得到一次智能化的进化机会。现在很多场景已经有了非常成熟的ReAct Agent应用,比如智能客服、知识助手、个性化营销、智能销售助理等等。
在下一篇文章中,风叔将介绍另一种AI Agent设计模式,REWOO。
作者:风叔,微信公众号:风叔云
本文由@风叔 原创发布于人人都是产品经理,未经作者许可,禁止转载。
题图来自Unsplash,基于CC0协议。
该文观点仅代表作者本人,人人都是产品经理平台仅提供信息存储空间服务。
- 目前还没评论,等你发挥!


 起点课堂会员权益


